Fall is fully here. We’ve had our first snowfall. About 15-20 cm November 5th to 6th overnight. Most of it has melted – but not all. I actually put my snow tires on…
Anyway, I’ve been a little bored so…
Fall is fully here. We’ve had our first snowfall. About 15-20 cm November 5th to 6th overnight. Most of it has melted – but not all. I actually put my snow tires on…
Anyway, I’ve been a little bored so…
Since my last post, there have been some developments. Booting from USB went from being inconsistent to being a non-starter. So, back to the old faithful hard drive boot. I have four internal 300GB SAS drives in a RAID-5 configuration. Since I have my VMs on the Synology NAS using iSCSI, the internal drive array was never used for much. Sometimes I would have a specific VM that wanted to make sure would be up in the event that the NAS went down such as the UniFi controller. I realised that isn’t a real worry. Along with having backups on both NASes I have an offline backup where the configurations of pfSense, Unifi and ESXi are kept.
ESXi backups are important as noted in previous posts. For quick reference (maybe mine!) the instructions are provided by VMware in the KB article How to back up ESXi host configuration. More steps are needed than pfSense of UniFi but it is something I do on at least a monthly basis or before and after I make any major configuration changes.
I’m not sure if booting ESXi from USB is an issue with my DL360p Gen8 server, the USB thumb drive (and I tried several) or ESXi 7.x. I do know that booting from the internal drive array does work and I’ll stick with that.
I also updated to the most current patch level of ESXi after the change to booting from the internal drive array. The update to ESXi 7.0.2 (build number 17867351) went flawlessly – although as slow as always. A great resource (especially if you do not use vSphere) is VMware Front Experience‘s VMware ESXi Patch Tracker. Great resource – including step-by-step instructions in a pop-up.
I realized last night that in my efforts to get ESXi up and running, I had installed the original release of ESXi 7.0. Since I had taken Friday off work to take care of a few things that needed to be done during the weekdays I decided to upgrade ESXi to Update 2. It also allowed me to test my theory from my previous post.
The update worked as planned (and boy-oh-boy are updates slow!) but was successful. As I expected the iSCSI share did not show up in ESXi. Let’s check the NAS and see if the targets are still there and if the ESXi server is connected. Yep, ESXi is shown as a host in DSM.
Okay, ssh into the ESXi box. Can I ping the NAS? Yes, working fine.
Log into the ESXi console (again, I’m not using vSphere). The software iSCSI sees the host and the target. But, no iSCSI devices are showing up under storage devices and obviously the datastores are not present.
Let’s try my theory from the last post. Try esxcfg-volume -l and get the UUIDs. Well now, iSCSI volumes are not showing up. Let’s try a few more pings to the NAS, rescan the devices. Nope, not working.
Time for some deep thinking. No panic this time as I know that the VMs are still in the iSCSI LUNs and I just have to get them mounted. And I have good backups!
Some more Googling and the first result from Reddit (vSphere 7.0 U2 iSCSI not working with older HP Lefthand SAN) seems to have the answer. It seems that the issue is around the IQN and how ESXi is handling this. I deleted the ESXi host on the NAS and re-created it. A rescan of the storage devices showed the iSCSI LUNs. I then did the esxcfg-volume -l and mounted, using esxcfg-volume -M UUID (with the “M” rather than the “m” option), the two UUIDs. Bang, the datastores reappears. While the article is for upgrades and not reboots, my gut is that this problem will persist until the bug is squashed. I haven’t tested a reboot because this is a pain in the arse and I have other things I have to do.
From the Reddit post, there is now a KB article from VMware on this issue (iSCSI adapter IQN may change during the upgrade of ESXi 7.0 U1 (84339)). I didn’t see the workaround (I’ll try it if a patch not available and I have to shutdown the ESXi or NAS) but here is that workaround example from the article:
To work around the issue:
Prior to the upgrade, use the esxcli get and set commands to set the generated iSCSI adapter IQN explicitly. As the IQN is a user setting it won’t change after the upgrade.
Get the IQN details:$ esxcli iscsi adapter get -A vmhba67
vmhba67
Name: iqn.1998-01.com.vmware:w1-hs3-n2503.eng.vmware.com:452738760:67
Set the IQN details:$ esxcli iscsi adapter set -A vmhba67 -n iqn.1998-01.com.vmware:w1-hs3-n2503.eng.vmware.com:452738760:67
EDIT
I couldn’t wait for the next time that I needed to reboot the ESXi server. That is probably a good idea given that I probably don’t want to have a number of things going on at the same time. I applied the VMware KB work around and then shutdown the VMs and rebooted the server.
SUCCESS! The iSCSI datastores automatically came up. A gin and tonic with lots of ice may be in order!
On Sunday, I upgraded my Synology DS216+II to DSM 7.0. I followed the DSM 7.0 reviews by Robert (Robbie) Andrews on NAS Compares and made the plunge starting with the DS216 – my backup NAS. Things went well so on Wednesday evening my main NAS, the RS1221+ was upgraded. As my VMware ESXi 7.0 has its VMs on the RS1221 using iSCSI, I shut down the ESXi server because past experience has shown me that the remote datastores “disappear” when the NAS shuts down and won’t reappear until the ESXi box is rebooted. (More on that later, I may have found a workaround.)
Anyway, the RS1221 DSM 7.0 upgrade went well. For both the DS216 (which is technically underspeced as it only has 512 MB of RAM and 1 GB is recommended but it is on the Synology compatibility list) and the RS1221 the new interface is really snappy. Login is much, much faster. So far, so good.
After about a half-hour – enough time for the RS1221 to “settle in” – I powered on the ESXi server. And discovered that my iSCSI datastores were no longer there. First thing to check was the RS1221 to make sure that iSCSI was running and the LUNs with the VMs was still there. Ok, everything fine there. I could see the ESXi host connected on the RS1221.
Back to the ESXi server. Under storage I could see that the Software iSCSI adapter was there. So were the iSCSI targets. But no datastores… Ok, rescan. No dice, still no datastores. Time to reboot.
And… ESXi would not come up. It could not find the internal USB thumb boot drive. A moment of panic until I remembered I had (not recently but recent enough) backed up the ESXi configuration (twice – once to the DS216 and once to the RS1221). As I do not use vCenter, I had to backup the configuration from the ESXi shell. This will save a lot of time and effort instead of starting the configuration from scratch. That information can be found in the VMware Knowledge Base: How to back up ESXi host configuration. Time to grab a couple of new USB thumb drives (one for the installer, one as the destination) and make a new boot drive.
And… I could not get the new installation (not the installer) to boot. I could boot from the installer thumb drive and the installer could see the destination thumb drive and install ESXi. But there was no way that the server would boot ESXi after installation. Manually selecting the thumb drive didn’t work either. By now it was getting late and I had to work in the morning. Off to bed.
Thursday evening, and after a lot of trial and error I remembered that the three thumb drives I was using as targets have been used as FreeNAS/TrueNAS installers. Now, TrueNAS uses FreeBSD as its base and that seems to do some strange things to the signatures on the drive. Even with deleting the partitions and formatting the drive as FAT32 didn’t help. Weird. Finally, I also recalled that when I was first installing FreeNAS I had a similar problem with disk signatures. Solution: remove the disk signature on the target thumb drive and all was well – ESXi would boot. Since I had the backup of the ESXi box’s configuration, I applied the backup and the configuration returned.
But… the iSCSI datastores were still not there. It was getting late again and I had to work Friday. Off to bed for a not-so-restful night.
After a lot of Googling I found an article on VirtualizationHowto.com by Brandon Lee titled VMware ESXi 6.5 Can’t Add Existing iSCSI LUN (from back in December 2016 for ESXi 6.5!) that was most helpful. It is great for troubleshooting. Anyway, the high level solution (details in the article) was to:
esxcfg-volume -l
esxcfg-volume -m UUID
Magic – the datastores reappeared. (I had to do it twice – once for each of the iSCSI targets. I think the next time using a “-M” to make it permanent over reboots. I’ll get around to that.) This might also fix the need to reboot the ESXi box when I have to reboot the NAS or have to reboot the switch when I upgrade the firmware.
Now, on backups:
Synology has a free application called Active Backup for Business. You have to register when you install it, but it is still free. Active Backup for Business lets you backup your VMs even if they are live. If you do not have vCenter (I don’t), you need to enable ssh and ESXi Shell for Active Backup to work. (An aside: After enabling ssh and ESXi Shell the settings did not stay set after reboot. I think that was a warning that the original USB thumb drive was starting to fail.) You also need to enable Changed Block Tracking (CBT) on the ESXi host to reduce the transferred data size and time for backup because CBT backs up only the blocks that are changed since the previous backup. Synology (and VMware) has a nice article on how to do this in the KB article How to enable CBT manually for a virtual machine. Unfortunately, I have not found how to automatically backup the ESXi configuration yet. This is a great solution for Synology users.
The other thing is that I am, one could say, religious on backing up configurations. The pfSense configuration is backed up pre and post changes and upgrades as is the UniFi configuration. I back them up to three locations: the DS216, RS1221 and on my “work” laptop. I also keep previous firmware available so I can rollback if needed (or available – the DSM upgrade can’t be rolled back). Backups are a good thing!
As it finally started warming up I noticed that our electric bill was not going down as expected. We use electic heat (for hot water as well and we have a heat pump) so one would expect that as temperatures increased the power bill would go down. After some thought, I realized that I had two things in the rack that while helping keep the office warm during winter were not helping at all during the summer.
The lesser of the “problem” children was the HP DL360 Gen7. I used it only for testing – and that utility was greatly reduced when VMware ESXi 7.0 was no longer supported on its architecture – and it was only on for brief periods (it had not been on for over 45 days). While it was powered off, there was still power usage as it was not truely off but in standby mode.
The biggest problem was my Supermicro TrueNAS (FreeNAS) server. That server is a beast with old technology. The specs were:
I did not need dual Xeons running at up to 95W each. The dual 740W power supplies were not helping either. (Yes, I know that they don’t always draw 740W)
I really love TrueNAS. It has amazing flexibilty and stability. The first plan of attack was to see about swapping out components but even on the used market this would have been costly because, well, it is a server – you can’t easiy swap out the motherboard and put in a single processor with lower power requirements. And that doesn’t address the issue of the dual 740W power supplies. Even the RAM is relatively power hungry compared to modern components. So, that would not work.
I briefly thought about going to an iXsystems TrueNAS Mini but that was not inexpensive either and there is no rackmount model (yes, a little “vanity” on my part). The rackmount TrueNAS systems ain’t cheap either.
After additional thought, I started considering Synology (again). About 10 years ago, I purchased a Synology DS211j. A nice little unit that intoduced me to DSM. Over time, the ability to transcode was degraded by the march of technology. I then purchased a QNAP TS-219P II just to server as a media server. With newer releases of DSM, the perfomance of the 211j became painful. I then upgraded to a DS216+ II and retired the DS211j. Over time, the 1TB drives were upgraded to 2TB drives and then 3TB drives with the older drives being handed down to the older NASes.
Finally, the limitation of the two bays became evident as I increased the number of VMs I had. I had started using iSCSI to increase my storage space between the ESXi server(s) and the NASes. I was then on the quest to upgrade to something that was four-plus drive bays and was rack mountable. I looked at Synology but the four-bay unit was overpriced (in my opinion – yes, I know that rack mount adds about 25% or more for the price as the cooling requirements in a rack has implications and, well, they always seems to charge more for rack gear because they can…). After doing my research, particularly from information from Tom Lawrence of Lawrence Technology Solutions I decided on FreeNAS. After looking at price (including shipping) I ended up with the aforementioned Supermicro server. (Which came with rails. <rant>Why do used server vendors charge for rails? Average $100? What do they do with the ones they can’t sell? Argggg!!!</rant)>
So, I was back at what to replace the TrueNAS server with? Well, I’m back to Synology. A RS1221+ to be exact. It is a nice little box:
The RX1221+ is not perfect. At this price level:
I also added five new Seagate IronWolf 4TB drives. I’m not happy with the shenanigans Western Digital got up to with their Red line. Three of the old WD Red 3TB drives are moved from the old TrueNAS server to the RS1221+ as another pool (SHR2 for the 4TB pool, SRH for te 3TB pool) for backups, additional capacity if needed. The remaining two 3TB drives went to the RS216+ II. That leaves two spare 2TB WD Red drives. I’ll have to figure out what to do with them. Maybe I’ll sell them with the Supermicro server.
The second part of my upgrades was the start to redudancy. While we’ll likely be going back to the office (or maybe not) and classroom by the fall, work/learn-from-home is likely going to stay. And if you are at home you need to ensure that you have connectivity. I added a UniFi SW24 G2 switch as the new core switch leaving the old SW24 as a backup. I still need to figure out what to have as a redundacy for the pfSense firewall. I’d like something rack mounted (with the same number and type of NICs so that I can simply restore the configuration). These are items you can’t just drop down to BestBuy and pick up here.
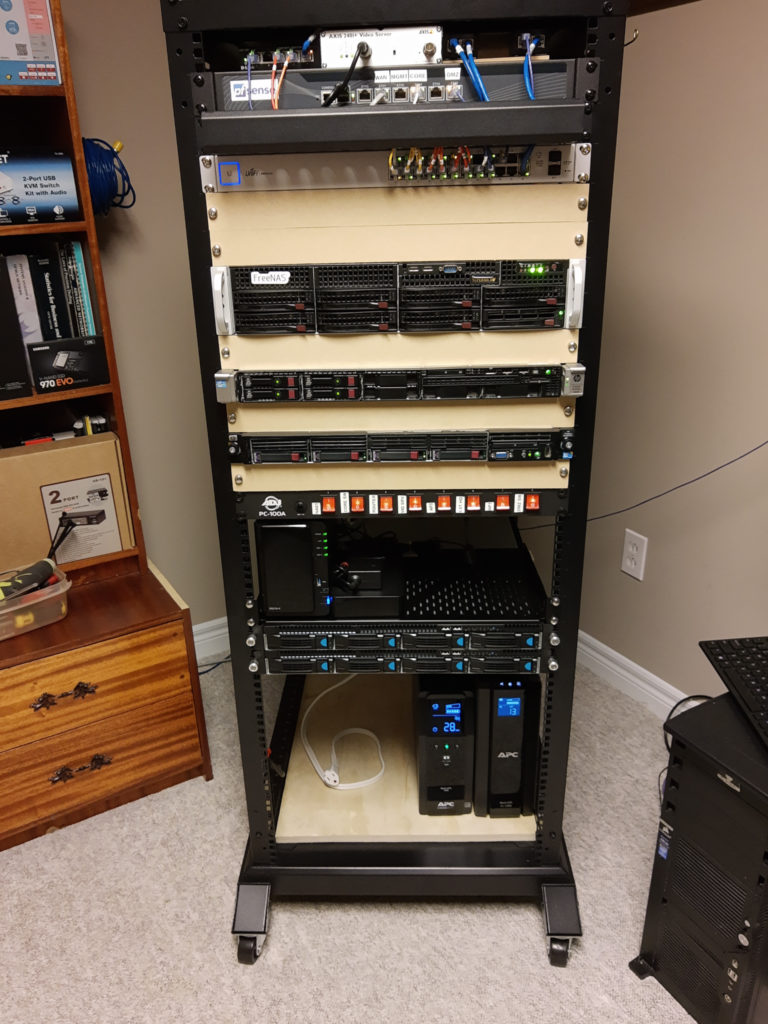
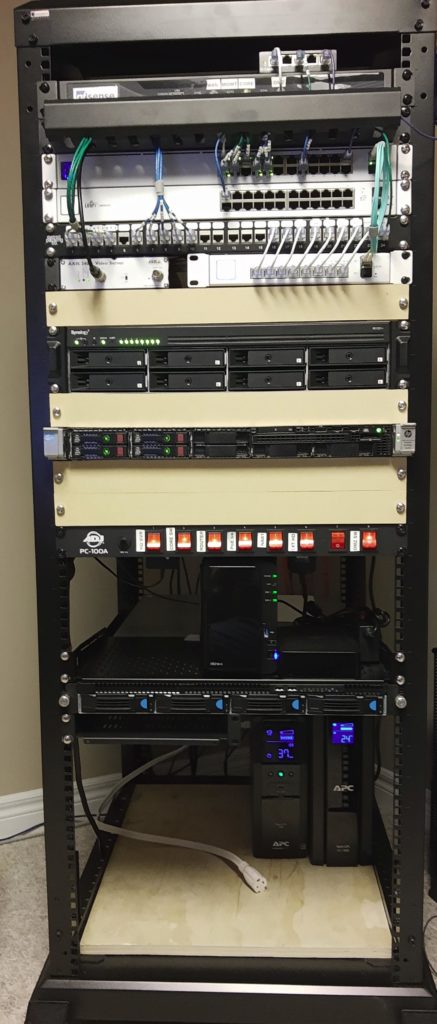
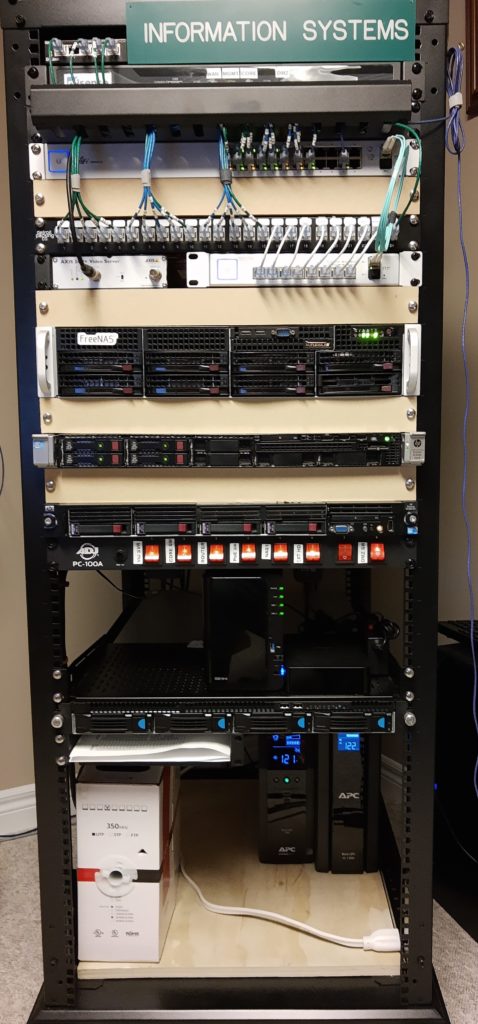
Anyway, here is what the rack looks like now (all cleaned up):
I just realized the I registered pelleys.com back on October 2, 2000….

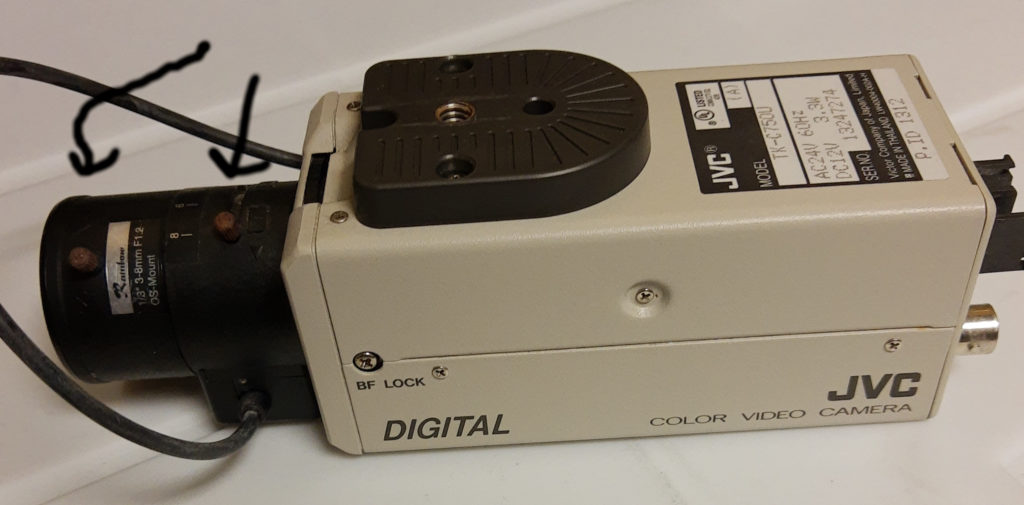
Back in August, August 23rd to be exact, the camera for wx.pelleys.com died in the afternoon. It was a nice warm day. The camera, a Panasonic TK-C750C, was about 10 years old. That’s a pretty good age given it is outside in an enclosure. The enclosure, actually the second one, has a heater and a fan for cooling, but in this environment (wind blown sea air) I’m not surprised failed. It looks like the sensor broke. The sea air actually croaded the chromed thumbscrews on the lens! The arrows point to the former silver thumbscrews.
I started my search but I couldn’t decide on whether to get another analog camera or go with a higher definition IP-based camera. As noted in my previous post, my dad got ill in September and then passed away in October.
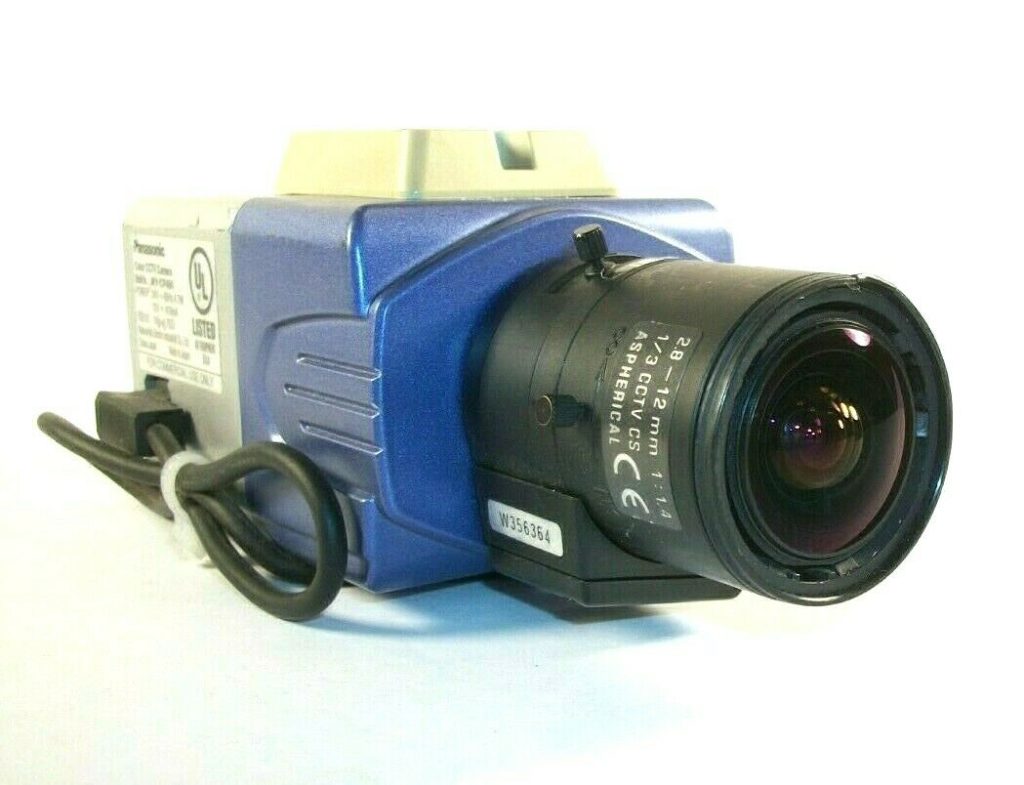
Finally, I got around to replacing the camera. The weather had to be decent (which we haven’t had for the past two week – rain, drizzle, fog and lots of wind) to replace it. I decided to cheap it out and went for another analog used camera. This time a Panasonic WV-CP484 with a 2.8-12mm lens. This lens has a slightly higher zoom than the old camera.
If I can get another 5 years out of this camera, I’ll be pleased.
Anyway wx.pelleys.com’s web cam is back up.
Back in August I posted on my latest updates to the home lab. At that time, I had added a new HP DL360p Gen8 to replace the old G7 for ESXi, added a UniFi Flex Mini for the office and replaced some of the old CAT5e “thick” cable with the Monoprice Cat6A SlimRun patch cables. I was planning some additional upgrades/replacement when my father fell ill in September and then passed away in October. Since dad died my sister and I have been quite consumed with being executors of his estate.
Since then, I have been able to make a few upgrades and replacements:
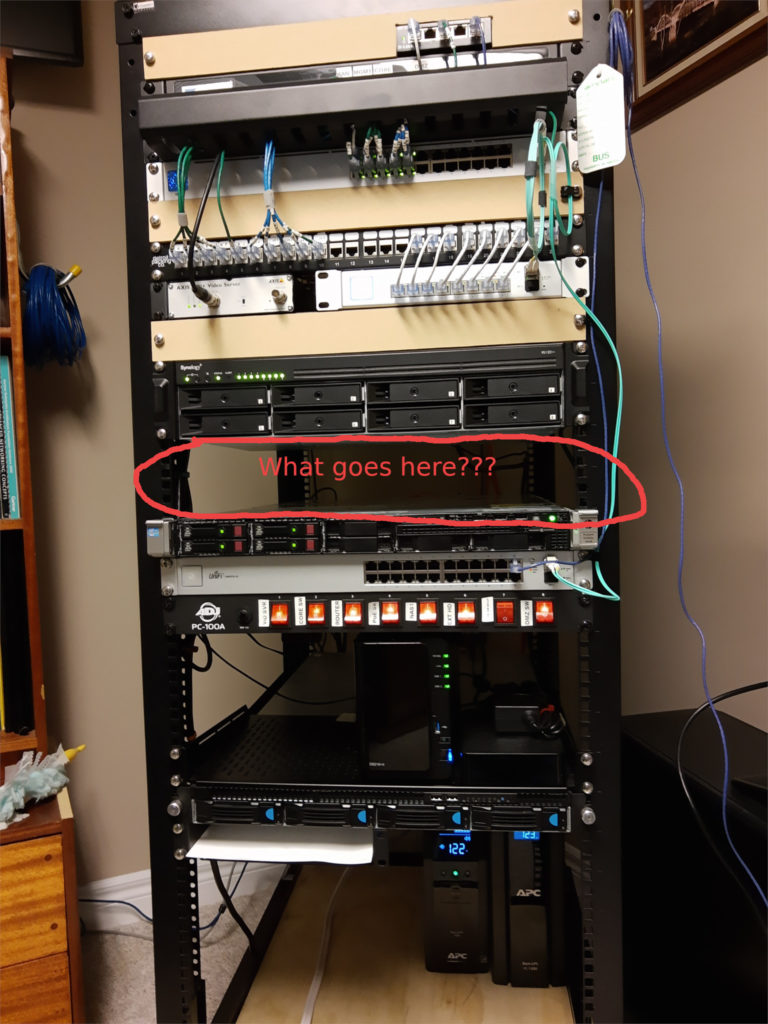
So, what’s next? I’m not quite sure. I was thinking about replacing the the Supermicro TrueNAS server with a HP DL380 Gen8. I like the HP BMC as it uses a HTML5 remote console instead of Java like the Supermicro. But, given that work-from-home/school-from-home enviornment that is likely to continue for some time, I’m thinking about redundancy. This is especially the case for the pfSense box. I can get away for a period of time replacing the Switch 24 (not without pain) but pfSense is another matter. I thinking about buying anothe box just like the one I have. If I buy a UniFi Switch 24 G2 and another pfSense box I’ll have perfect components for my home lab – moving PROD away from DEV 🙂
I have a bunch of weather station time lapse daily web cam files (found here: Historical 24-hour WX Timelapse Videos) where the date of the web page index is the day after. This has bugged me for the past three years, but it was one of those things to “get around to”.
I finally got “around to it” (after getting tired of experimenting with pfSense haproxy for now). So that I will remember how I did it, my code is:
#!/bin/bash
# Rename the file based on the modified date
#
# go through the list of .mp4 files
for file in *.mp4 ; do
# Part 1 - for each file get the modification date and put it in a string. $file needs double quotes
# due to spaces in the original
        part1="$(stat -c %Y "$file")"
# Part 2 - for each file add the destination location, format the new filename based on creation time (YYYY-MONTH-DD) and add the ".mp4" extension
        part2="fixed/$(echo "$part1" | awk '{ print strftime("%Y-%B-%d", $1)".mp4" }')"
# Uncomment this to test first :-)
#       echo $file " is now" $part2
# This is the actual move of the original file (double quotes due to the spaces in the filename) to
# the new directory. Use --preserve so the modification date doesn't change
        cp --preserve "$file" $part2
# All done
done
It may not be the prettiest, most efficient code, but it works.
Well, I’m almost at the end of the server/network upgrade for now. Since the last update, here’s where we are from the last update: