DLNA: pfSense and IGMP Proxy – nope, use pimd

This is more of a note to myself than a real post…

If you have different subnets and want to use a DLNA-based media server it will not work. This is correct by design! DNLA is a local network, broadcast protocol! But, if you have the need it can be done by using an IGMP proxy to pass the network broadcasts across subnets; effectively “routing” it.

Unfortunately, it is broken on pfSense since, it seems, 2.2.x. I even downloaded the most recent version and it still did not work. There is an alternative, pimd.

pimd has to be manually installed and configured on the command line (i.e., ssh into your pfSense box). It is not hard to install or configure. My pimd.conf is simple:

 phyint igb0 disable
 phyint igb1 disable
 phyint igb2 disable
 phyint igb3 disable
 phyint igb4 disable
 phyint igb5 disable
 phyint igb3.30 enable
 phyint igb3.100 disable
 phyint igb3.25 enable
 phyint igb3.20 enable
 phyint igb3.201 disable
 phyint ovpns1 disable
 phyint ovpns2 disable
 #bsr-candidate igb3.20
 bsr-candidate priority 5
 rp-candidate time 30 priority 20
 group-prefix 224.0.0.0 masklen 4
 spt-threshold packets 0 interval 100

You only need to disable any physical interfaces or VLANs where you don’t want DLNA broadcasts and enable the physical interfaces and VLANs where you do want DNLA broadcasts. I keep a backup copy in a directory since it is not an official package your configuration may be removed by an upgrade.

Also, since this is not an official package you need use shellcmd to enable automatic startup:

/usr/local/sbin/pimd -c /usr/local/etc/pimd.conf

I put in feature request in pfSense’s redmine site to include pimd as a native package.

Posted in Uncategorized | 2 Comments

Summer Project

Well, adding the door to the rack has taken the back burner. Not quite as interesting as I want. However, I think I will need to replace the rack posts with the “square hole” type. I thought that having the telco-style rails – tapped screw holes – would be best but it turns out, and I should have known better – that most equipment rails now come configured for square holes. It is easier – quicker – to mount rails into square holes as you don’t have to, well, screw anything in. :-S

Those four rails cost $100… 🙁

So the summer project is… A new NAS!

As I have posted about over the past number of years, I have three NASes. The old Synology DS211j that I use for iSCSI storage for my VMware ESXi server, a Synology DS216+II for documents and photos and a Qnap TS-219P II for movies and music. Even for me, three NASes is a little excessive. Two deficiencies that I have are: 1) each of these units only has two drive bays – that obviously limits expandability and 2) each of the units only has one network port – which means that to share DLNA services (movies, music) I have to use IGMP proxying to go across subnets. Since I use DLNA, I need good trascoding ability. I also use Docker for the Synology controller and have some more ideas of things to do with Docker.

So, this has arrived:

On the bottom is a

  • Supermicro YS-6027R-3RF4+ chassis
    • 8 x 3.5″ hotswap drive bays
    • 2 x 3.5″ internal drive bays
    • 2 x 740 watt Platinum Power Supplies
  • Supermicro X9DR3-LN4F+ motherboard
    • 2 x Intel Xeon E5-2630 V1 Hex (6) Core 2.3GHzRAM
    • 32GB DDR RAM
    • LSI 9210-i8 HBA
    • 4 x Intel 1 Gbit/s onboard NICs
    • Onboard IPMI with KV

Phase 1 is to install FreeNAS. I have been messing around with ZFS, jails, etc. for the past month or so. I need to get some more disks; I have two 4 TB WD Reds, err…, ready. I need two more. Once that is done I can start removing the disks from the old Synology and Qnap NASes. But for now, I need to do some more experimentation.

On top are two Quanta S98J QSSC 1U rackmount server cases with 4 x 3.5 hotswap nays. They don’t have power supplies yet. They will be phase 2 of my plan. I will be adding another LSI HBA with two external (or more) SFF ports. On each of the Quanta’s I will be adding an external SFF port (like this) with a 4 cable SATA breakout. Of course, I have to find some affordable power supplies.

Once more note – Supermicro IPMI with KVM is awesome. Right up there with HP iLO or Dell PERC. It lets me sit in a comfortable recliner and watch TV.

Posted in Uncategorized | Leave a comment

Homemade Server Rack – Work-in-Progress: Update 1

A very quick update: I have the facing completed now. I added back the TP-Link TP-SG1024DE into the rack for some reason… Maybe to fill up space? I might use it for the DMZ instead of the 5-port unmanaged switch. Here is what it looks like now:

Next step: Making a door…

Posted in Uncategorized | Leave a comment

Homemade Server Rack – Work-in-Progress

I wanted to put my rack gear in a rack. I have my HP DL360, the pfSense router and my Ubiquti Switch 24 and I didn’t like having them on my wire bakers rack. I didn’t look neat.

When I looked into it buying a half-height rack was over CND$500 (plus shipping and taxes). I found plans for making a rack a Tom Builds Stuff – thanks Tom! Total price: about CND$150.

This is still a work-in-progress. I am putting on some finished sides (that I can easily remove if I need to). I will update this post once I have that done.

I was going to follow Tom’s plan for the outer enclosure but I clearly realized that I don’t have the skills for finished carpentry and I don’t have all the tools and space required. I also realized that the 2 x 4s that I hand picked are bowed, crooked, kinked, cuped and twisted – yes, all of them.

So I decided to use 1/4 inch Standard Hardboard Panel and used finishing washer and screws to attach the panels to the frame. I decided to use 2 ft. x 4 ft. sheets because I couldn’t get a 4 ft. by 8 ft. sheet in the SUV. The added benefit is that I also can take off one panel if I have to access the upper or lower half from the side. (Glass-half-full thoughts…) Here’s what it looks like now:

Here’s what it sort-of looked like (before a lot of changes):

Posted in Uncategorized | 1 Comment

#HMX-1 #MV-22B @ #YYT (or some USMC Presidential Aircraft at St. John’s Airport)

Now for something a little different… Earlier today I heard a “strange” aircraft. I was not quite sure what it was but quickly forgot about it. I happened to be out by the airport when I noticed a couple of USMC C-130Js on the apron. USAF (or Air National Guard) C-130s aren’t all that rare – they often stop off here before staring or ending the hop over the “pond.” USMC, well, that is different.

C-130Js at YYT

When I went down there were three MV-22B Ospreys on the apron. But not just any Ospreys – they were from HMX-1, the USMC squadron responsible for transporting the United States President (no matter who they are :-)).

HMX-1 MV-22B – Check the oil, please!
MV-22B’s don’t know how lucky they are to bask in the sun at YYT
Posted in Uncategorized | Leave a comment

Network Upgrade (Part 3)

The last part of the network upgrade was to upgrade the Ethernet switch from an unmanaged (dumb) switch to a managed (smart) switch. For Christmas, I picked up a TP-Link TL-SG1024DE. It was okay… sort of. It has a GUI (plus an Windows application) to configure the switch. One strange thing was that it could not encrypt the link – no HTTPS (at least with V3 of the firmware).

TP-Link has a strange way of creating 802.1q VLANs. There was one page used to create the VLANs but another to create the native VLANs for each port – which TP-Link calls PVIDs. The GUI seemed to time out at times when I was doing a bunch of configurations. It worked fine but was not quite what I was looking for in a switch.

What to do? Hmm… Well, I do like the Ubiquiti controller software and the Ubiquiti Switch 24 seemed to fit the bill… 24 GigE ports, 26 Gbps non‐blocking throughput, power to forward simultaneously traffic on all ports at line rate without any packet loss at 52 Gbps. And the link lights are on the ports, not off to the side so I can easily see what is happening on each port. Oh, and two GigE SPF ports (not SPF+ on the 24-port – too bad, 10 Gbps would have been nice). Not that I’m planning on using fibre any time soon. I did not get the PoE version since I only have one AP and only plan on have one (or two at the most) more APs.

The great thing is, again, the UniFi Contoller. I had the VLANs created previously and they were applied when I adopted the switch into the controller. I also cleaned up my network creating a “real” core just for the networking side of things. That way the pfSense router, the AP and the switch are on their own VLAN and subnet separate from the server VLAN and subnet.

In case anyone happens to be wondering you need to manually tell the switch where the UniFi controller is if it is not on the same subnet. This is done by (from https://itaudiotech.blogspot.com/2017/06/ubiquiti-what-to-do-when-switches-arent.html):

set-inform http://ip_of_UniFi_controller_here:8080/inform

Next item is that second AP. This time I think it will the the in-wall version, the UniFi In-Wall… I seem to have the empty network jack in the kitchen and I don’t have to worry about a power supply with PoE… Hmmm…

Posted in Uncategorized | Leave a comment

Network Upgrade (Part 2)

Wow! Two posts in two days 🙂

The second network upgrade was on the WiFi side of things. Again, I am blaming this on Tom Lawrence‘s YouTube channel where he reviewed the Ubiquiti access points. As I noted in Part 1, I had two access points in place – an Netgear EX6200 with OpenWRT and a stock Asus RT-N65U. (The reason why the RT-N65U was using stock firmware is that because of the chipset used, it does not seem that there is any maintained alternative firmware.)

The reason behind the EX6200 running OpenWRT is that I wanted a guest WiFi network for when friends and family come over. Not that I don’t trust my friends and family – I just don’t know if they practice safe computing. Plus, I wanted to implement VLANs.

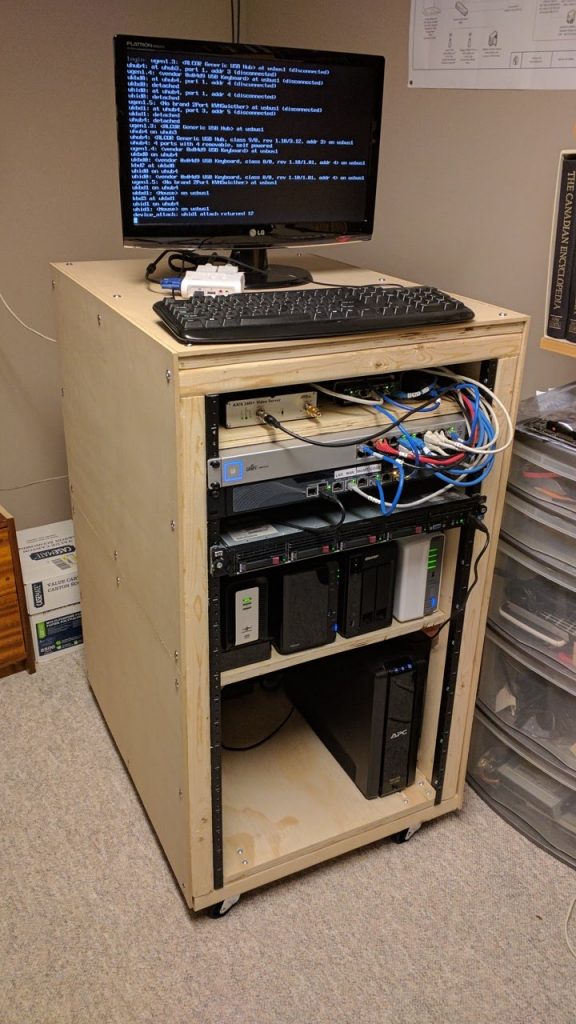
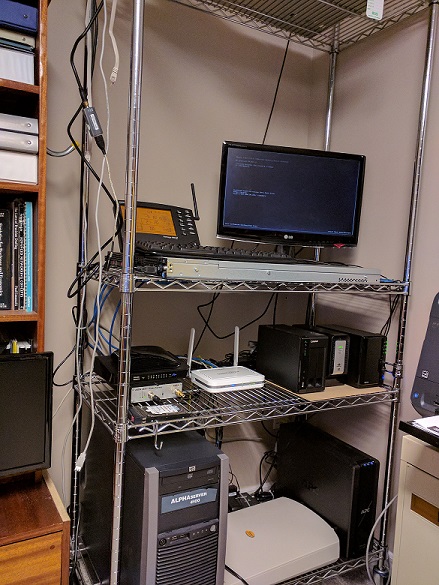
It may sound “strange” that I have not put in VLANs previously, the fact is that it was an “around to it” task (actually, I did have it in place about 20 years ago but that old Nortel 10 Mbit/s 5-port switch gave up the ghost about 18 years ago). What I have been using was unmanaged* switches connected to router-based ports (e.g., each port was the gateway for their respective subnets). While this works, it does seem consume a lot of cables and switches without much flexibility 🙂

To get the guest WiFi network up-and-running, I needed VLANs because it didn’t seem that there was any easy way have guest access blocked to the home network without VLANs. Or have a separate guest access point (no…). (Yes, the guest WiFi only being able to access the Internet works when, for example, the RT-N65U is running as a router and a WiFi access point, but if you put it in access point mode that ability disappears.)

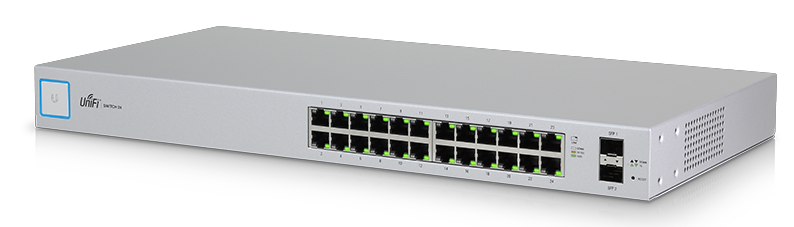
So, back to Tom Lawrence’s reviews of the capabilities of the the Ubiquiti UniFi access points. I was impressed! It works, well professionally. It is not quite as, I guess good is the word, as say a Cisco Meraki system, but it is nowhere near as expensive.

I settled on the UniFi AC AP Lite. The coverage is so good it replaced both the RT-N65U and the EX6200. It was easily mounted on the ceiling plus the PoE meant that I didn’t need to worry about where to plug in that wall wart power adaptor. I am seriously thinking about adding a second AC AP Lite in the future.

But the real icing on the cake is the UniFi Controller software. This can be an appliance with their Cloud Key product but will nicely run on a PC or a server. Or, in a Docker container – jacobalberty has a nice distro on Docker Hub and Crosstalk Solutions has a nice YouTube video tutorial on how to set it up on a Synology NAS Docker container. (See previous posts on my selection of Synology for two of my NASes.) The UniFi Controller does not have to up all the time (but if it isn’t you can’t really make any changes and some features are not available) but since a NAS is likely to be running all the time it is a good fit. I will say that you should watch the full Crosstalk Solutions video where it shows how you can have the configuration saved on the NAS so that when you upgrade the UniFi controller without having to restore your configuration.

I really like the ability to define you networks on the UniFi Controller and it is propagated through all the UniFi devices. Nice and easy software defined networking!

And since it was so nice… Well… Stay tuned for Part 3…

*unmanaged is apparently not a real word. And neither is untrusted (it is distrusted) – but what do I care?

Posted in Uncategorized | Leave a comment

Network Upgrade (Part 1)

As I keep saying, I am not a blogger and I do not post very often or with any regularity. Sometimes I use this blog for posting items that I would like to remember later and had a hard time finding. And, I always try to give credit where credit is due (likely my university science degree background…).

Anyway, about a year ago my SonicWall TZ205W went out of support. It was getting old anyway and many features I would like were not available. Bell Fibe (what used to be Bell Aliant FibreOp – I think FibreOp sounds cooler than Fibe, but anyway…) upgraded me to 500 Mbit/s. The TZ205W could barely push 100 Mbit/s. The neat Sonicwall “published apps,” if you will, either needed ActiveX (what?!?!?!) or Java. Java has security issues (especially outbound) and I don’t need to say anything about ActiveX.

I really like SonicOS – I know that this is a polarising statement – but it worked just fine for me. I liked the SonicWall appliances from the old, used, SoHo 3 I picked up from a local newsgroup to the TZ170 Enhanced to the current TZ205W. I started looking at a new SonicWall but that was pushing the budget limit with the annual maintenance. Plus, adding IDPS, etc. could really slow the system down. I also did not need a wireless version as I had Asus and Netgear access points. Now, I do not need 500+ Mbit/s but is do want it!

One of my staff – who is very open source – mentioned pfSense. It seemed interesting but I would have to procure my own hardware. I like having separate network infrastructure even though I’m a big VMware ESXi fan. I then spent a few months thinking about it…

I then happened on a video on YouTube by Tom Lawrence of Lawrence Technology Services. I like Tom’s videos; they can be a little technical which is great and his howto guides are great. Anyway, after watching a couple of his videos on pfSense I started looking at the Netgate SG-3100. Hmm… It is an appliance – like my old SonicWalls – so I would not have to buy additional hardware and ran pfSense. Looking good. I then went to buy it and… It was out of stock on Amazon (Canada). Dunh!

More thought…

I started researching what others were using for hosting pfSense and noted a few products. I eventually landed on a rack mountable chassis with 6  Intel 82583V GigE interfaces, an Intel I5-2540M with AES-NI support (was going to be required for pfSense 2.5 but no longer; that being said, it does help with OpenVPN offloading), 2 GB RAM and a 32 GB SSD on Amazon (Canada) for about $400 (similar to this one). Now, it did come with pfSense, from China, so that had to go. (Do not use it, do not upgrade it; reinstall from an official download. See this video.)

Off with a fresh, clean, checksummed ISO from pfsense.org I installed pfSense 2.4.4. I configured everything basically the same way that I had the old TZ300W (stay tuned for part 2 on what come out of that) and this was the result of my first speed test:

Posted in Uncategorized | Leave a comment

Bowring Park Lit Up for Christmas – 2018 December 9

Just a few pictures of Bowring Park on the night of 2018 December 9… All lit up for Christmas.

Peter Pan Statue in Bowring Park – 2018 December 9
Duck Pond in Bowring Park  – 2018 December 9
Bridge in Bowring Park – 2018 December 9
Duck Pond in Bowring Park – 2018 December 9
Posted in Uncategorized | Leave a comment

Let’s Encrypt, nginx and certbot – a short story

Well, the duration – for me -was not short. It was about two weeks of living in Google. 

Here’s the setup: I have a couple of servers in my DMZ that I want share out. Some places do not let web traffic out on non-standard ports (i.e., TCP 80 and 443) so I wanted to share out the two servers on my single IP address. As I like to try different things, I decided on using nginx instead of Apache HTTPD. (I like both – some things in nginx seem a little more organized…) Setting up nginx as a reverse proxy – no problem at all! 

Of course, I am – within reason, see my post on HTTPS everywhere – in agreement with encryption. Thus, Let’s Encrypt was next on the list. With my other static web servers (using Apache HTTPD) no problem; good old certbot is brain dead easy.

Not with a reverse proxy (I also tried Apache HTTPD without luck) – at least for me. Repeated 404 errors… “not authorized”… Arrrgggg… Google university was of no help – all the same basic instructions. Same error. 

Until… 

I found this post on StackExchange by ph4r05. Basically, I had to use a manual verification with the manual plugin. This meant adding a TXT record to my DNS server. 

To do this:

certbot -d YOUR_FQDN_SERVER_NAME --manual --preferred-challenges dns certonly

This will give the response:

Please deploy a DNS TXT record under the name
_acme-challenge.YOUR_FQDN_SERVER_NAME with the following value:

667drNmQL3vX6bu8YZlgy0wKNBlCny8yrjF1lSaUndc

Once this is deployed,
Press ENTER to continue

Of course, the value will change for you (and it will change each time you do a manual validation). Once you get that key you will need to go into your (publicly accessible!) DNS server with a TXT record of:

_acme-challenge.YOUR_FQDN_SERVER_NAME TXT 667drNmQL3vX6bu8YZlgy0wKNBlCny8yrjF1lSaUndc

(or however your DNS server enter it).

You then have to wait until Google’s name servers (8.8.8.8 or 8.8.4.4) updates. This took under 5 minutes for me. Once that is done (you can check with the linux dig command for propagation) hit ENTER. You will then have to put in your nginx site config the paths to the Let’s Encrypt certificates;e.g.,:

/etc/letsencrypt/live/YOUR_SITE_NAME/fullchain.pem/
/etc/letsencrypt/live/YOUR_SITE_NAME/pivkey.pem

Restart nginx – and Bob’s your uncle.

Hopefully, someone else will find this post and it will save some time.

Posted in Uncategorized | Leave a comment